Copyright © 2011-2014 airxc.com, airxcell.com
Table of Contents
The Quick Start Box is a little helper shown upon startup of the program that enables the user to quickly create a new Workspace of open an existing Workspace. The Quick Start Box is shown on Figure 4.1, “Quick Start Box”.
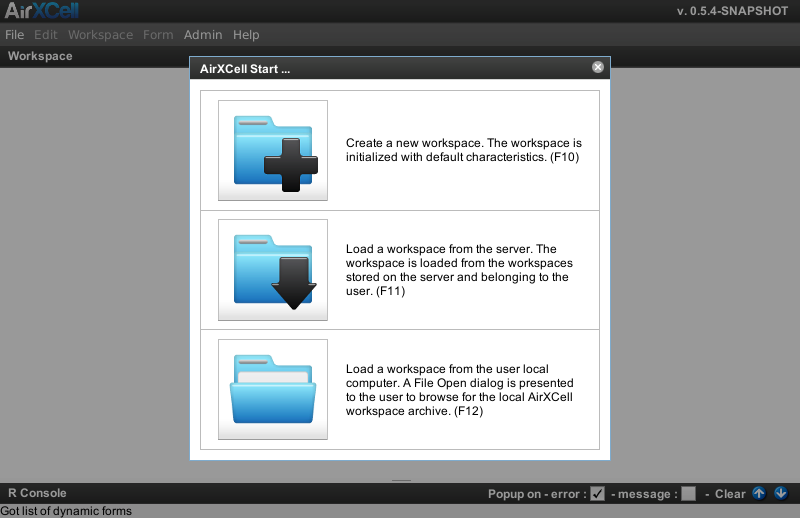
The Quick Start Box offers three possible actions:
A new workspace is always initialized with a default empty Calculation Sheet (5) module as shown on Figure 4.2, “AirXCell GUI” presenting the AirXCell GUI.
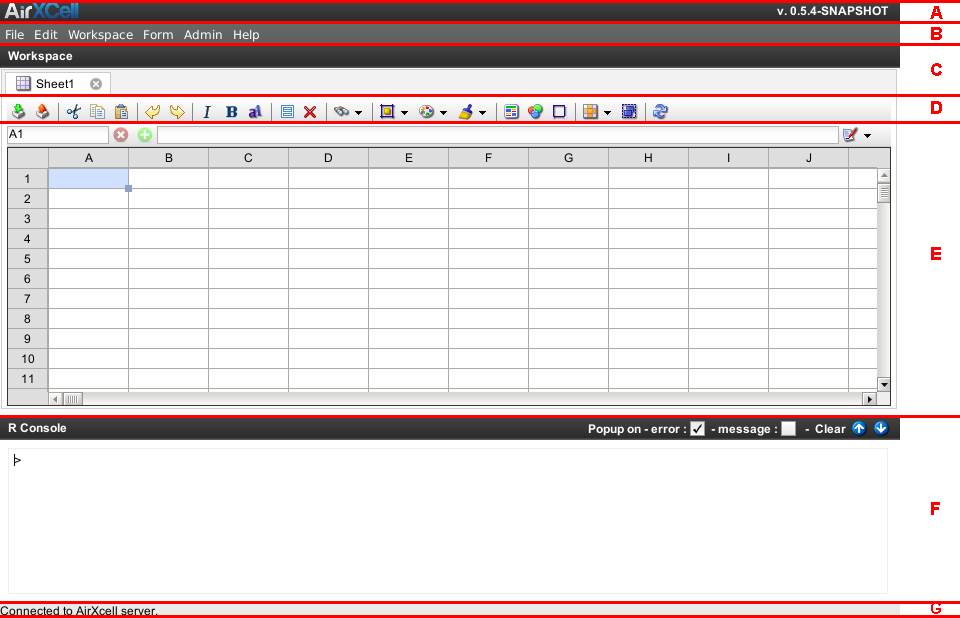
The GUI components are the following:
The title bar is currently only used to display the version of the AirXCell software.
Each and every feature from the AirXCell software is available from the main menu which is divided in various categories as listed below.
The File menu is laid out as follows:
 New Workspace :
create a new workspace
New Workspace :
create a new workspace
 Close Workspace :
close current workspace
Close Workspace :
close current workspace
 Open Local Workspace ... :
open a workspace stored on the remote AirXCell server. See Section 4.4.2, “Load Workspace from the AirXCell server”.
Open Local Workspace ... :
open a workspace stored on the remote AirXCell server. See Section 4.4.2, “Load Workspace from the AirXCell server”.
 Save Local Workspace :
save workspace on the user local computer. See Section 4.4.3, “Save Workspace”.
Save Local Workspace :
save workspace on the user local computer. See Section 4.4.3, “Save Workspace”.
 Save Local Workspace as ... :
give/Change workspace name and save it on the user local computer . See Section 4.4.3, “Save Workspace”.
Save Local Workspace as ... :
give/Change workspace name and save it on the user local computer . See Section 4.4.3, “Save Workspace”.
 Open Workspace on server ... :
open a workspace stored on the local computer. See Section 4.4.1, “Load Workspace from local filesystem”.
Open Workspace on server ... :
open a workspace stored on the local computer. See Section 4.4.1, “Load Workspace from local filesystem”.
(Ctrl + O) Save Workspace on server :
save workspace on the remote AirXCell server. See Section 4.4.3, “Save Workspace”.
Save Workspace on server :
save workspace on the remote AirXCell server. See Section 4.4.3, “Save Workspace”.
(Ctrl + S) Save Workspace on server as ... :
give/Change workspace name and save it on the remote AirXCell server. See Section 4.4.3, “Save Workspace”.
Save Workspace on server as ... :
give/Change workspace name and save it on the remote AirXCell server. See Section 4.4.3, “Save Workspace”.
 Import ... :
import a file into a new or an existing module instance in current workspace. See Section 4.5.1, “File Import”.
Import ... :
import a file into a new or an existing module instance in current workspace. See Section 4.5.1, “File Import”.
 Export ... :
export current module instance content in a file and download it. See Section 4.5.2, “File Export”.
Export ... :
export current module instance content in a file and download it. See Section 4.5.2, “File Export”.
 Preferences ... :
show Preferences / Settings configuration box. See Section 4.6, “Preferences / Settings”.
Preferences ... :
show Preferences / Settings configuration box. See Section 4.6, “Preferences / Settings”.
 Start Box ... :
show Quick Start Box. See Section 4.1, “Quick Start Box”.
Start Box ... :
show Quick Start Box. See Section 4.1, “Quick Start Box”.
 Quit :
quit the application
Quit :
quit the application
The Edit menu is specific to the module currently being displayed. It simply reproduces the elements and actions from the module toolbar (4.2.3).
The Workspace menu is laid out as follows:
 New Module → New Calcsheet :
instantiate a new Calculation Sheet (5) module and add it to current workspace.
New Module → New Calcsheet :
instantiate a new Calculation Sheet (5) module and add it to current workspace.
 New Module → New Editor :
instantiate a new R Code Editor (6) module and add it to current workspace.
New Module → New Editor :
instantiate a new R Code Editor (6) module and add it to current workspace.
 New Module → New Chart :
instantiate a new Chart Wizard (7) module and add it to current workspace.
New Module → New Chart :
instantiate a new Chart Wizard (7) module and add it to current workspace.
 New Module → New DataFrame :
instantiate a new Data Frame Editor (8) module and add it to current workspace.
New Module → New DataFrame :
instantiate a new Data Frame Editor (8) module and add it to current workspace.
Go To Module : this provides a way to reach a module from the menu, just as if clicking on the module tab title. This is usefull when there are many module instances in the workspace in order to be able to quickly reach one or another.
 Rename current module :
rename the current module instance, the one being currently displayed in the workspace. One should note
that modules can be renamed as well by right-clicking on the module
tab title.
Rename current module :
rename the current module instance, the one being currently displayed in the workspace. One should note
that modules can be renamed as well by right-clicking on the module
tab title.
 Close current module :
close the current module instance and remove it from the workspace.
Close current module :
close the current module instance and remove it from the workspace.
(Ctrl + Shift + Del) Close all modules :
close all module instances in this workspace and reinitialize it with a default module.
Close all modules :
close all module instances in this workspace and reinitialize it with a default module.
-
Close workspace :
close current workspace.
 Toggle R Console :
take up or tear down the R Console
Toggle R Console :
take up or tear down the R Console
(Ctrl + Shift + O)
The Form menu is laid out as follows:
 1. manage assets :
instantiate a new "1. manage assets" dynamic form and add it to the
current workspace.
1. manage assets :
instantiate a new "1. manage assets" dynamic form and add it to the
current workspace.
-
2. manage FOREX :
instantiate a new "2. manage FOREX" dynamic form and add it to the
current workspace.
-
3. Manage Portfolios :
instantiate a new "4. Manage Portfolios" dynamic form and add it to the
current workspace.
-
4. Compute Stock Volatility :
instantiate a new "4. Compute Stock Volatility" dynamic form and add it to the
current workspace.
-
5. Analyze Assets :
instantiate a new "5. Analyze Assets" dynamic form and add it to the
current workspace.
-
6. Portfolio Optimization :
instantiate a new "6. Portfolio Optimization" dynamic form and add it to the
current workspace.
-
7. option Pricing :
instantiate a new "7. option Pricing" dynamic form and add it to the
current workspace.
-
New Form :
Create a new Dynamic Form and add it to the workspace. The form belongs
to the user for whom it is private and can be developed by the user.
Manage Forms : Manage user private forms.
The User menu is laid out as follows:
 Edit Current User :
edit current user informations such as address, email, etc.
Edit Current User :
edit current user informations such as address, email, etc.
-
Change Password :
change current user password.
 Logoff :
log current user off the AirXCell application.
Logoff :
log current user off the AirXCell application.
The Help menu is laid out as follows:
 AirXCell Help :
show AirXCell user guide / help (this document)
AirXCell Help :
show AirXCell user guide / help (this document)
-
R Help :
show help about the R environment and R commands
 About AirXCell :
show Informations about AirXCell
About AirXCell :
show Informations about AirXCell
 Submit a bug :
submit a bug
Submit a bug :
submit a bug
 Propose an enhancement :
submit a new enhancement request.
Propose an enhancement :
submit a new enhancement request.
Each and every module in AirXCell proposes its specific user interactions or functionalities on its own private Module Toolbar. That toolbar is specialized for every module presented in the further chapters related to modules.
The R console provides the user with an R command line interface quite like the
default R shell command. The user can use that console to run R commands like just as in an usual console. In
addition, as of AirXCell
version 0.5.10-SNAPSHOT
, some of the commands generated by the modules
are displayed in the console as well or even only in the console such as for instance those executed by
the R Code Editor. (6)
The R Console attempts to implement a real command line console in a web browser. It is currently still far from perfect
yet it's pretty usable. Multi-line inputs are supported as well as pager listings (used for instance to show helps).
One of the difference swith a standard R command line is that Ctrl + C is used by the R console
for usual copy-paste operations. Canceling a multi-line input for instance is achieved
with ESCAPE.
The status bar displays the messages returned by the server when a user action involving any kind of exchange with the AirXCell server is executed. In addition, on the right-most side of the Status Bar, there is a progress bar that pops up whenever an interaction with the AirXCell server occurs.
The workspace (2.1.4) is the folder containing the various module instances (2.1.1.1) representing a unit of work in AirXCell. The first element on the top of the workspace display area is the title bar. A workspace that has already been persisted or loaded has a name which is shown on the workspace title bar.
The module instances (2.1.1.1) are located below the workspace title bar in seperate tabs. Each module instance has its own tab. The workspace is actually the collection of all these module instances. It manages them using these tabs which the user can use to display a module instance or another. Module instances can be closed by pressing the Close icon on the right of the tab. The part located below the tab belongs to the module instance.
The user can navigate through the module instances being displayed in the workspace either by clicking on the module titles or by using keyboard shortcuts:
(Ctrl + Shift + Home): display first module instance(Ctrl + Shift + PgUp): display previous module instance(Ctrl + Shift + PgDown): display next module instance(Ctrl + Shift + End): display last module instance(Ctrl + Shift + Del): close current module instance
Workspaces can be loaded and saved either on the remote AirXCell server or on the local filesystem of the user.
Workspaces created by the user can be saved or loaded either locally on the user computer's filesystem or remotely on the AirXCell server. The workspace is saved along with the modules instantiated by the user as well as every variable she might have created manually in the R environment using either the R Console (4.2.4) or the R Code Editor (6). Even the log lines displayed in the console are correctly saved and restored upon workspace load.
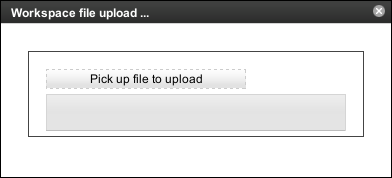
AirXCell is a Web 2.0 application. As such it consists of a remote server executing the application while the user uses it on a local GUI downloaded from the server by the web Browser. As such, any workspace stored as a local file needs to be uploaded first on the remote AirXCell server in order to be opened. AirXCell provides a specific Dialog for uploading the local workspace file. The Workspace load from local filesystem Dialog is shown on Figure 4.3, “Workspace Load from local filesystem”.
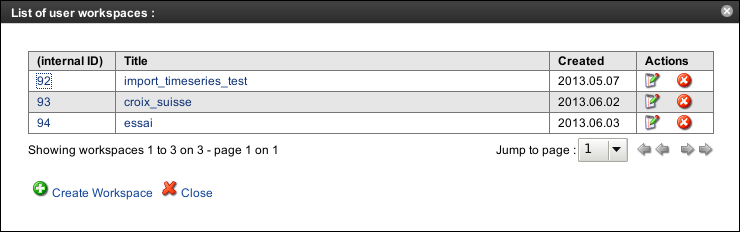
Workspaces stored on the server are available from a specific Dialog listing every workspaces the user has stored on the AirXCell server as shown on Figure 4.4, “Workspace Load from server”.
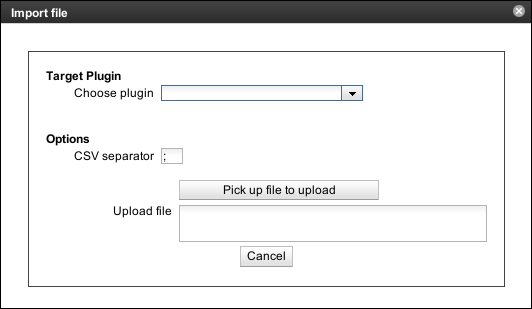
Every module within AirXCell supports file import / export, except the Chart Wizard. For instance, the Calculation Sheet supports CSV files import / export (5) while the R Code supports text or R files import / export (5).
The file import / export Dialog however is not bound to any specific module and can be shown from the global file menu. Whenever it is displayed from a specific module instance though, it is preconfigured with settings respecting that module instance.
The File import Dialog enables the user to choose in which module should the given file be imported. The user also has the possibility to import the file in a new module in which case the type of the module instance to be created is induced by the type of the file. The supported file types are currently CSV files and R text files only. A CSV file imported in a new module triggers the creation of a new Calculation Sheet (5) module instance while a text file is by default imported in an R Editor (6).
The File Import Dialog is shown on Figure 4.5, “File Import Dialog”.
The File export Dialog enables the user to choose what module should be exported. The type of the result file (such as CSV, R text file, etc.) is induced by the selected module.
The File Export Dialog is shown on Figure 4.6, “File Export Dialog”.

The user can edit some preferences and settings within AirXCell. The Preferences / Settings
configuration box is shown using
File → Preferences
(![]() )
)
Currently, only the resolution of the generated plots (charts / graphics) can be set as user preferences. The user can choose whatever resolution she wants for generated charts and reset the resolution back to the default value.
The default value is computed by AirXCell to match the user display resolution.