Copyright © 2011-2014 airxc.com, airxcell.com
Table of Contents
- 5.1. Presentation of the Calculation Sheet UI
- 5.2. Calculation Sheet Features
- 5.3. Values and Formulas
- 5.4. R as the formula language
- 5.5. Navigation, shortcuts and selections
- 5.6. The Calculation Sheet Toolbar
- 5.7. The Value and Formula Toolbar
- 5.8. The Calculation Sheet contextual Menu
- 5.9. Import / Export
The Calculation Sheet module is an implementation of a Spreadsheet application on top of the AirXCell framework. It attempts to support most common spreadsheet features. The user typically types some values in some of its cells, and formulas in others to compute results on these values. It is intended to become a clone of the most popular spreadsheet software out there (i.e. Excel not to name it), yet with a true calculation environment behind the scene instead of the poor calculator of the original product.
The Calculation Sheet module within AirXCell is still somewhat limited as of version 0.5.10-SNAPSHOT of AirXCell. Yet is is fully functional and, on a few points, it goes much beyond the current state of the art spreadsheet applications available.
A new empty Calculation Sheet can be added to the workspace by using
Workspace → New Module → New Calcsheet
(![]() )
)
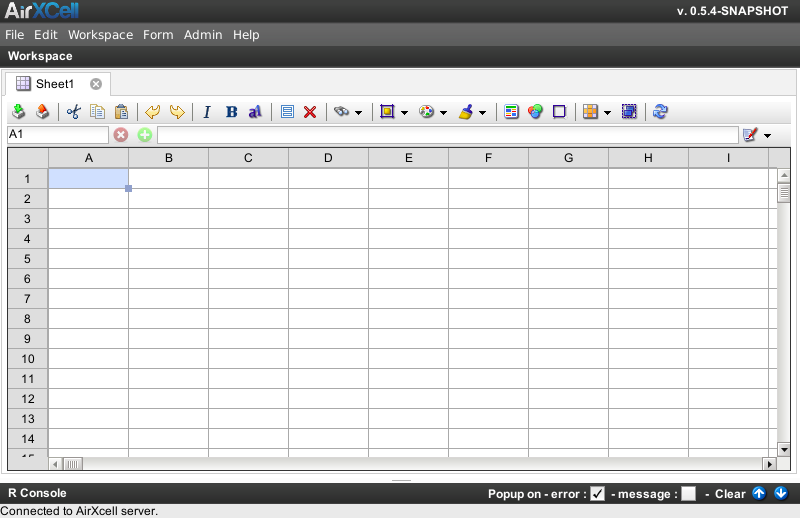
A newly created Calculation Sheet looks as shown on Figure 5.1, “New Calculation Sheet”.
Most common features of a spreadsheet software are supported:
- Various Data Types, Formulas, and Functions.
- Support for basic Number format.
- Automatic recalculation.
- Cell names
- Cell (ranges) reference.
- Copy, Cut And Paste.
- Charts and Charts (with the help of the Chart Wizard (7)).
- Cell merging.
Other features such as the Undo / Redo stack, printing or sorting are not supported yet but will be supported before version 1.0 comes out.
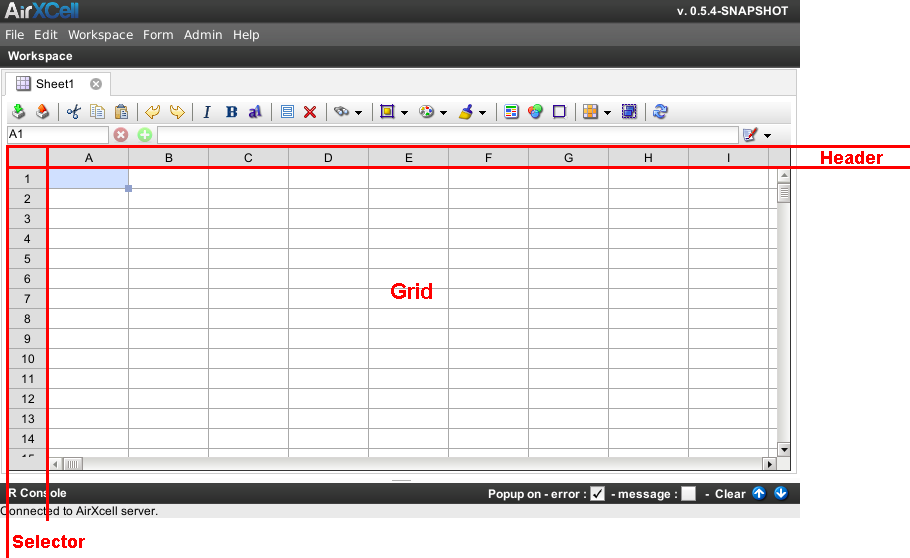
The Calculation Sheet User Interface is laid out as follows:
where:
-
The Header displays the column names. Columns can be selected by dragging the mouse while holding pressed the left button across columns. Columns can also be resized.
In addition, it provides a Contextual Menu to interact with the current column or the selected columns. The menu is reached by using the right button of the mouse. reach
-
The Selector displays the row numbers. Rows can be selected by dragging the mouse while holding pressed the left button across rows. Rows can also be resized.
In addition, it provides a Contextual Menu to interact with the current row or the selected rows. The menu is reached by using the right button of the mouse.
- The Grid holds the cells of the spreadsheet.
-
Formulas are not tight to the limited usual LISP-style language taking the form of a succession of parenthesis, keywords, Cell (-range) identifiers and values. Although such kind of formulas are obviously supported, AirXCell cells can contain any real R expressions with conditions, loops, new functions or any other element supported by the R language. The only limitation regarding formulas is that the user must type an R script than eventually returns a value should he want something actually displayed in the cell.
For instance, one might well type in a quite common formula inspired from the Excel world:
=sum(D:D) / NROW(D4:D12)Yet, one might as well use a much more complicated formula expressed with the R language:
=cnt <-0 ; for (i in 1:9) { if (not (is.null (eval(parse(text=paste("Sheet1$val[", (3 + i), ",4:4]", sep='')))))) { cnt <- cnt + 1 } }; sum(D:D) / cnteven though, of course, this syntax is completely overkill, inefficient and makes no sense in this context. It is however interesting to see how different instructions can be executed by simply separating them with a semicolon.
The cell (-range) references used in formulas can have the same form that in Excel, such as for instance
C23:F87or the usual R matrix form, such as for instanceSheet1$val[3:6,23:87].Cell reference shifting in formulas copy-pasted elsewhere, i.e. shifting the cells referenced in the formula in such a way that the relative distance to the referenced cell remains the same, is obviously supported. The dollar ($) symbol used to avoid cell reference shifting is also supported.
Formulas always start with an = ("equals") character, i.e. they are identified by the AirXCell engine
by the fact their first character is an =.
Anything else is considered a value and is not computed by the R backend, only stored.
Formulas are interpreted immediately. Whenever a formula has a dependency on other cell(s), any change applied directly on this (these) cell(s) triggers the recomputation of the given formula. In the AirXCell terminology, this is called the Dependency Management System. A cell referencing other cell(s) in its formula is considered having (a) dependency(-ies) on this (these) cell(s). There is no limit to the amount of dependencies a cell can have or the length of so called chained dependencies.
As stated above, AirXCell is not limited to the LISP-style formula language as in other usual spreadsheet software. In fact, any cell containing a value starting with an equals (=) sign is considered a formula and interpreted by the R calculation backend. The formula is preprocessed by AirXCell of course in order to convert Excel-style formula references or ranges into something understandable by the R backend.
The Calculation sheet represented on the GUI is manipulated by the AirXCell backend. The computations triggered whenever the user types a formula in a cell occurs however in the R backend. As a consequence, the R backend should have the other cell values at its disposal in order to use them in its own calculations.
This is the reason why the AirXCell server maintains a copy of the calculation sheet as a matrix
inside the R environment. Each calculation sheet manipulated by the user has its counterpart
on the R side in the form of a matrix. Every matrix is identified by a number and an R variable. The R
variable is always Sheeti$val where i
is the internal number of the calculation sheet.
The AirXCell GUI always indicates the user what is the internal number of each spreadsheet. By default, when a new calculation sheet is created, it has a name of the form Sheet 1 where 1 is the internal number of the calculation sheet.
Whenever the user renames the spreadsheet, the internal number disappears from its name, hence the GUI shows it
in parenthesis just beside the new name given by the user. It is thus always possible to get the name of the
matrix on the R side by using that internal number, such as for instance the number 9 in
Sheet9$val.
This way, the user can manipulate the calculation sheet using the functionalities from the AirXCell GUI, yet she is also perfectly able to use the calculation sheet values and results in R scripts created and executed through an R Code Editor (6) or from simple R commands executed in the R Console (4.2.4)
Again, each and every values typed into a cell by the user is immediately set in the corresponding position of the matrix in R. This is only true for numerical values. Textual values (strings) are not copied within the R environment.
One should note that this also applies to results computed from cell formulas by the R backend. Every result is stored in the matrix on the R side as well.
As a sidenote, one should bear in mind that only cell formulas are preprocessed by the AirXCell server before
being sent to the R backend. Scripts manipulated through the
R Code Editor (6)
or from the
R Console (4.2.4)
are not. Hence excel-like cell references or ranges notations such as A1, A1:C10 or
A:B are not supported there, only in cell formulas. One needs to use the R matrix notation.
A few correspondances are given here as examples:
Table 5.1. Excel style - R matrix style notation correspondance
| Excel style | R matrix style |
|---|---|
A1 | Sheetx$val[1,1] |
A1:C5 | Sheetx$val[1:3,1:5] |
A:C | Sheetx$val[1:3,] |
1:5 | Sheetx$val[,1:5] |
Again, Excel style formulas in the form of =sum(D:D) / NROW(D4:D12) are perfectly supported by
AirXCell. There are however a few differences, some of them being quite significant:
- In case a function taking more than one parameter is called, the parameters need to be separated by a coma, not a semicolon as in Excel (usual R function call syntax).
-
The functions at disposal of the user are R functions, not Excel functions. Thus, for instance, there is
no
PRODUCTfunction available, but the good old Rprodfunction. For a list of available functions the reader might want to have a look at the R documentation at the R project web site.
Much more interestingly however, is the ability given to the user to use real R scripts and instructions within cell formulas. The R instructions can even be mixed in with Excel-style cell references or range notations. An example has already been given in Section 5.2, “Calculation Sheet Features”
For instance, the if clause within AirXCell is pretty different than its Excel counterpart. When one uses
in Excel
=IF(AND (A1 > 10, OR (A2 < 10, A2 > 100)), "Larger", "Smaller")
should be written this way in AirXCell:
= if (A1 > 10 && (A2 < 10 || A2 > 10")) { "Larger" } else { "Smaller" }
Yet, again, the full power of the R language is available from within an AirXCell cell on the spreadsheet.
For instance, one can use long time missing feature in Excel, the for loop:
= a <- 1 ; for (i in A1:A2) { a <- a + 1 } ; a
even though, again, this very example is pretty lame.
A cell is always marked current on the spreadsheet. The current cell is indicated by its light blue background color. On Figure 5.1, “New Calculation Sheet”, the current cell is the first one on the top-left of the grid.
Right under the toolbar of the calculation sheet is an input text box showing the
identifier of the current cell. The top-left cell is identified A1. One
can change the current cell by typing another identifier in this text box.
The user can also move the current cell to a new position using either :
- the UP, DOWN, LEFT and RIGHT arrows on the keyboard or
- the scrollbar and the mouse or
- PAGE_UP and PAGE_DOWN to move the current cell down, respectively up or
- or, as said before the cell identifier input text box.
One should note that the keys UP (PAGE_UP), DOWN (PAGE_DOWN), LEFT or RIGHT can be held down making the grid being continuously scrolled up, respectively down, left or tight as long as the key is kept pressed.
In addition, the following additional shortcuts are implemented:
- HOME : moves the current cell to the first cell of the current row.
- Ctrl + HOME : moves the current cell to the first cell of the grid (Top-Left cell).
By using the left-click and moving the mouse, the user can select any arbitrary number of cells which can then be manipulated together. The resulting group of cells is called a Selection. For instance, pressing the Delete key when a selection is active on the Calculation Sheet causes all cells from the selection to have their values deleted.
A selection can be created from the mouse or using the keyboard. In order to create a selection from the keyboard, the user needs to press the Shift key and use the UP, DOWN, LEFT and RIGHT arrows key to extend the selection in the desired direction. In addition, AirXCell support multiple selections.
By default, everytime the user uses the mouse or the keyboard to select a set of cells, the previous selection is discarded. the user can use the Ctrl key when selecting a set of cells to add a new selection without discarding the former one.
The following keyboard shortcuts are supported to manipulate selections:
- Shift + UP : extend or reduce the last selection up
- Shift + DOWN : extend or reduce the last selection down
- Shift + LEFT : extend or reduce the last selection left
- Shift + RIGHT : extend or reduce the last selection right
- Ctrl + Shift + UP : extend or reduce the last selection up to the first cell of the current column that contains a value.
- Ctrl + Shift + DOWN : extend or reduce the last selection down to the last cell of the current column that contains a value.
- Ctrl + Shift + LEFT : extend or reduce the last selection left to the first cell of the current row that contains a value.
- Ctrl + Shift + RIGHT : extend or reduce the last selection right to the last cell of the current row that contains a value.
Most functionalities aside from browsing the data or editing values are available from the toolbar:
 Import File :
import a CSV file inside the Calculation Sheet.
Import File :
import a CSV file inside the Calculation Sheet.
 Export File :
export the Calculation Sheet values to a CSV file.
Export File :
export the Calculation Sheet values to a CSV file.
 Cut the cell(s) content :
cut the content of the current cell or the selected cells and put in the clipboard.
Cut the cell(s) content :
cut the content of the current cell or the selected cells and put in the clipboard.
(Ctrl + X) Copy the cell(s) content :
copy the content of the current cell or the selected cells and put in the clipboard.
Copy the cell(s) content :
copy the content of the current cell or the selected cells and put in the clipboard.
(Ctrl + C) Paste content into cell(s) :
paste the clipboard content into the current cell of the selected cells.
Paste content into cell(s) :
paste the clipboard content into the current cell of the selected cells.
(Ctrl + V) Undo :
undo last action (edit).
Undo :
undo last action (edit).
(Ctrl + Z) Redo :
redo last (undone) action (edit).
Redo :
redo last (undone) action (edit).
(Ctrl + Y) Change font style to italic :
change the font style of the current cell or the selected cells to italic.
Change font style to italic :
change the font style of the current cell or the selected cells to italic.
(Ctrl + I) Change font style to bold :
change the font style of the current cell or the selected cells to bold.
Change font style to bold :
change the font style of the current cell or the selected cells to bold.
(Ctrl + B) Choose cell font :
change the font name of the current cell or the selected cells.
Choose cell font :
change the font name of the current cell or the selected cells.
 Select all :
select all cells from the Calculation Sheet between the first cell of the sheet and the last one (most
bottom-right) that actually contains a value.
Select all :
select all cells from the Calculation Sheet between the first cell of the sheet and the last one (most
bottom-right) that actually contains a value.
(Ctrl + A) Delete selected values :
delete the value of the current cell or the selected cells.
Delete selected values :
delete the value of the current cell or the selected cells.
(Del) Find :
find a text pattern in the Calculation Sheet values. Replace is also available from here.
Find :
find a text pattern in the Calculation Sheet values. Replace is also available from here.
(Ctrl + F) Cell content alignment :
choose alignment of the data in the current cell or in selected cells.
Cell content alignment :
choose alignment of the data in the current cell or in selected cells.
 Choose font color :
change the font color of the current cell or the selected cells.
Choose font color :
change the font color of the current cell or the selected cells.
 Choose cell background color :
change the background color of the current cell or the selected cells.
Choose cell background color :
change the background color of the current cell or the selected cells.
 Choose Data Format ... :
change the presentation of the data presented within the current cell or the selected cells.
Choose Data Format ... :
change the presentation of the data presented within the current cell or the selected cells.
 Choose colors ... :
change advanced color settings for current cell or the selected cells.
Choose colors ... :
change advanced color settings for current cell or the selected cells.
 Set border settings ... :
change advanced border settings for current cell or the selected cells.
Set border settings ... :
change advanced border settings for current cell or the selected cells.
 Sheet manipulation :
entry point to rows or columns manipulation (add / remove row / column).
Sheet manipulation :
entry point to rows or columns manipulation (add / remove row / column).
 Merge / Unmerge :
merge current selection or unmerge current cell.
Merge / Unmerge :
merge current selection or unmerge current cell.
 Refresh full spreadsheet from R :
refresh the Calculation Sheet Content with the values from the Matrix instance within the R environment.
(Caution : text values contained in textual cells are lost in the process since only numerical values are stored
on the R side.)
Refresh full spreadsheet from R :
refresh the Calculation Sheet Content with the values from the Matrix instance within the R environment.
(Caution : text values contained in textual cells are lost in the process since only numerical values are stored
on the R side.)
Right below the Calculation Sheet module toolbar is the Value and Formula toolbar. This toolbar contains the following widgets:
The Cell Position Selector: the first widget on the left shows the identifier of the current cell and enables the user to reach a specific cell by typing in a valid identifier.
The Value and Formula Box: the next widget is used by the user to set cell values and formulas.
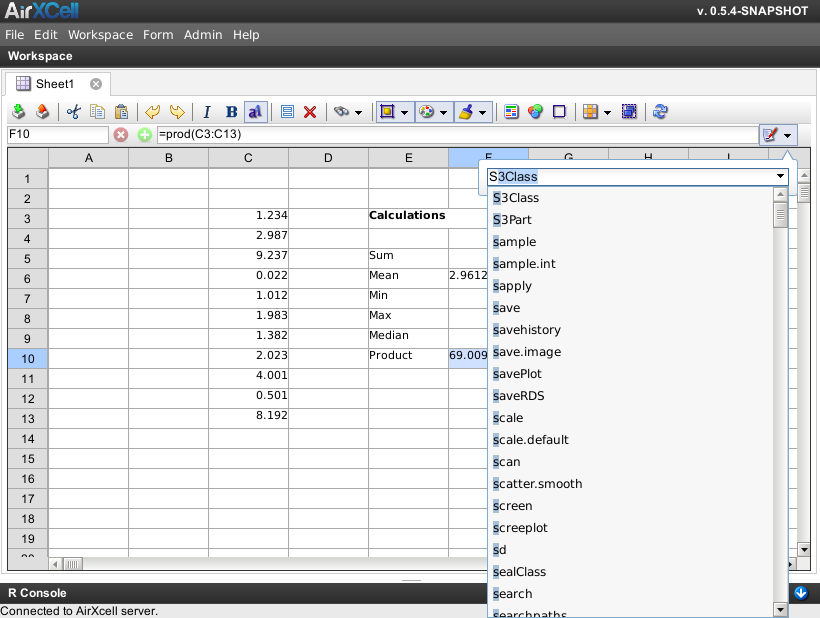
The Function List Assistant: the last widget on this toolbar is intended to be a true formula writing asistant. As of version 0.5.10-SNAPSHOT of AirXCell it is limited to displaying the list of available function
One should note that the list of available function highly depends of the set of loaded packages. See Section 2.2, “AirXCell is built on top of R” for more informations about available packages.
An example of the list of functions starting with letter 's' is shown on
Figure 5.3, “R functions list”.
The Calculation Sheet module implements a contextual menu on the sheet that pops-up whenever the user right-clicks on a cell, on a selection, on the header of the left bar. The context menu is a subset of the actions available from the toolbar (5.6) that apply on the context for which the context Menu is shown.
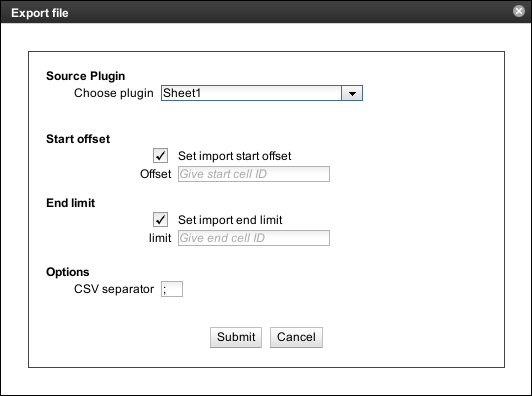
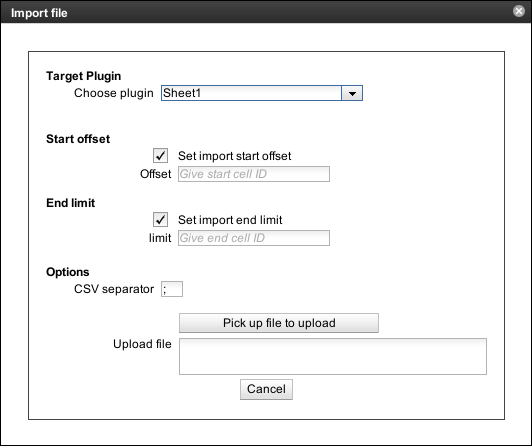
Following the presentation of the Import / Export feature in Section 4.5, “General Import / Export”, the calculation sheet toolbar provides shortcuts on its toolbar (5.6) aimed at instantiating the Import or Export Dialog preconfigured with settings matching the Calculation Sheet currently displayed in the workspace.
In addition to the target module, the user has the ability to choose where in the spreadsheet the content of the CSV file should be imported by giving the ID of the first cell of the area where the data should be imported as well as the last cell. Upon file export, the exported area can be specified the same way.
The File Import Dialog pre-configured with settings matching the current Calculation Sheet from the current workspace is shown on Figure 5.4, “File Import Dialog (for Calc Sheet)”.
The File Export Dialog pre-configured with settings matching the current Calculation Sheet from the current workspace is shown on Figure 5.5, “File Export Dialog (for Calc Sheet)”.